


一,SpringMVC的常用注解
一,RequestMaping
作用:为类和方法提供映射关系
源码:
//ElementType.METHOD作用于方法,ElementType.TYPE作用于类
@Target({ElementType.METHOD, ElementType.TYPE})
@Retention(RetentionPolicy.RUNTIME)//运行级别
@Documented//它代表着此注解会被javadoc工具提取成文档
@Mapping
public @interface RequestMapping {
    String name() default "";
    //path和value作用是一样的,声明映射路径
    @AliasFor("path")
    String[] value() default {};

    @AliasFor("value")
    String[] path() default {};
    //声明请求类型枚举数组类型
    RequestMethod[] method() default {};
    //声明映射参数
    String[] params() default {};
    //声明请求头部信息
    String[] headers() default {};
    //声明数据请求提交的类型
    String[] consumes() default {};
    //声明数据请求返回的数据类型
    String[] produces() default {};
}
一,RequestMapping的属性:
1,path和value
说明资源映射的路径
2,RequestMethod
说明请求的类型它是一个枚举类,总共有八种请求方式
public enum RequestMethod {
    GET,
    HEAD,
    POST,
    PUT,
    PATCH,
    DELETE,
    OPTIONS,
    TRACE;
    private RequestMethod() {
    }
3,param
说明请求头需要声明的参数,匹配则请求成功,反之失败
4,headers
说明请求需要的请求头部信息,匹配则请求成功,反之失败
5,consumes和produces
声明请求和响应的数据类型
数据类型:
常见的媒体格式类型如下:
- text/html : HTML格式
- text/plain :纯文本格式
- text/xml : XML格式
- image/gif :gif图片格式
- image/jpeg :jpg图片格式
- image/png:png图片格式
以application开头的媒体格式类型:
- application/xhtml+xml :XHTML格式
- application/xml : XML数据格式
- application/atom+xml :Atom XML聚合格式
- application/json : JSON数据格式
- application/pdf :pdf格式
- application/msword : Word文档格式
- application/octet-stream : 二进制流数据(如常见的文件下载)
- application/x-www-form-urlencoded : <form encType=””>中默认的encType,form表单数据被编码为key/value格式发送到服务器(表单默认的提交数据的格式)
二,RequestMapping请求参数的绑定
绑定参数名或者提供的input的name必须要和方法的参数名保持一致,这样才能形成映射关系
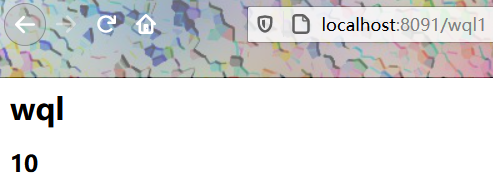
一,get请求的绑定
标签:
<a href="/wql?name=10" >a</a>
类:
@Controller
public class test1 {
    @RequestMapping(path = "/wql")
    public void  enter(String name){//a标签的参数name和方法的形参形成对应关系
       System.out.println(name);
    }
}
输出结果:10
二,post请求绑定
标签:
<form action="${pageContext.request.contextPath}/wql">
  账号:<input type="text" name="account">
  密码:<input type="text" name="password">
        <input type="submit" value="提交">
</form>
类:
@Controller
public class test1 {
    @RequestMapping(path = "/wql")
    public void  enter(String account,String password){
       System.out.println(account+"\n"+password);
    }
}
三,绑定bean对象
bean对象类:
@Controller
public class WQL1 {
    String account;
    String password;

    public String getAccount() {
        return account;
    }

    public String getPassword() {
        return password;
    }

    public void setAccount(String account) {
        this.account = account;
    }

    public void setPassword(String password) {
        this.password = password;
    }
}
标签:
<form action="${pageContext.request.contextPath}/wql">
<%--名称和bean实体类中的属性名一致--%>
账号:<input type="text" name="account">
密码:<input type="text" name="password">
<input type="submit" value="提交">
</form>
RequestMapping:
@Controller
public class test1 {
    @RequestMapping(path = "/wql")
    public void  enter(WQL1 wql1){//提交的数据和bean对象的属性自动产生映射
       System.out.println(wql1.account+"\n"+wql1.password);
    }
}
三,绑定集合
实体类:
Controller
public class WQL1 {
    String account;
    String password;
    ArrayList<String> list;
    Map<String,String> map;

    public ArrayList<String> getList() {
        return list;
    }

    public void setList(ArrayList<String> list) {
        this.list = list;
    }

    public Map<String, String> getMap() {
        return map;
    }
}
表单:
<form action="${pageContext.request.contextPath}/wql">
  账号:<input type="text" name="account">
  密码:<input type="text" name="password">
  name:<input type="text" name="list[0]">
  map:<input type="text" name="map['age']">
  <input type="submit" value="提交">
</form>
Requestmapping:
@Controller
public class test1 {
    @RequestMapping(path = "/wql")
    public void  enter(WQL1 wql1){
       System.out.println(wql1.account+"\n"+wql1.password+"\n"+ wql1.list.get(0)+"\n"+wql1.map.get("age"));
    }
}
二,RequestParam
作用:用于获取传入参数的值,之前获取参数的值形参的名称必须要和表单的名称一致,通过RequestParam名称不需要一致
源码:
@Target({ElementType.PARAMETER})
@Retention(RetentionPolicy.RUNTIME)
@Documented
public @interface RequestParam {
//name和value一样,输入映射的名称,必须要和表单的名称一致
    @AliasFor("name")
    String value() default "";

    @AliasFor("value")
    String name() default "";
//参数是否必须
    boolean required() default true;

    String defaultValue() default "\n\t\t\n\t\t\n\ue000\ue001\ue002\n\t\t\t\t\n";
}
属性:
- name和value:输入映射的名称,必须和表单的name一致
-
required:是否参数必须
例:
<form action="/wql1">
    <input type="text" name="name" >
    <input type="submit" value="提交">
</form>
@Controller
public class test2 {

    @RequestMapping(path = "/wql1")
    public void wql(@RequestParam(value = "name") String a){
        System.out.print(a);


    }
三,RequestHeader和CookieValue
RequestHeader:获取请求头部信息
CookieValue:获取Cookie信息
RequestHeader源码:
public @interface RequestHeader {
    //name和value声明请求头的key
    @AliasFor("name")
    String value() default "";

    @AliasFor("value")
    String name() default "";
    //是否必须要请求头部信息
    boolean required() default true;

    String defaultValue() default "\n\t\t\n\t\t\n\ue000\ue001\ue002\n\t\t\t\t\n";
}
CookieValue源码:
public @interface CookieValue {
//name和value声明Cookie的key
    @AliasFor("name")
    String value() default "";

    @AliasFor("value")
    String name() default "";
//是否必须要Cookie信息
    boolean required() default true;

    String defaultValue() default "\n\t\t\n\t\t\n\ue000\ue001\ue002\n\t\t\t\t\n";
}
例:
@Controller
public class test2 {

    @RequestMapping(path = "/wql1")
    //把头部user-agent的值赋值给a变量,Cookie的JSESSIONID赋值给变量b
    public void wql(@RequestHeader(value = "user-agent") String a,@CookieValue(value ="JSESSIONID")String b){
        System.out.print(a+"\n"+b);}
}
四,PathVariable
PathVariable作用:用于绑定url占位符 例:/wql/{id} id获取任意的字符,通过@PathVariabl(name="id") String a 赋值给字符串a
PathVariable是SpringMVC支持Rest风格URL的重要标志
PathVariable源码:
@Target({ElementType.PARAMETER})
@Retention(RetentionPolicy.RUNTIME)
@Documented
public @interface PathVariable {
    //name和value声明匹配的占位符ID
    @AliasFor("name")
    String value() default "";

    @AliasFor("value")
    String name() default "";
    //是否必须要占位符
    boolean required() default true;
}
例:
@Controller
public class test3 {

    @RequestMapping(value = "/ww/{id}")
    public void c(@PathVariable(value = "id")String a){
        System.out.print(a);
    }
}
五,RequestBoby和ResponseBody
RequestBody:将表单数据作为一个整体转换为json数据,赋值给变量
ResponseBody:将对象类型数据和其他数据类型转换为json类型进行返回响应
RequestBody源码:
@Target({ElementType.PARAMETER})
@Retention(RetentionPolicy.RUNTIME)
@Documented
public @interface RequestBody {
    boolean required() default true;//唯一一个参数,是否必须要进行json数据获取
}
ResponseBody源码:
@Target({ElementType.TYPE, ElementType.METHOD})
@Retention(RetentionPolicy.RUNTIME)
@Documented
public @interface ResponseBody {
}//无属性
例:
<form action="/wql2" method="post">
    <input type="text" name="name" >
    <input type="text" name="password" >
    <input type="submit" value="提交">
</form>
public class test4 {

    @RequestMapping(value = "/wql2")
     public void aas(@RequestBody String body){
      System.out.print(body);
     }
结果:
name=wql&password=123456
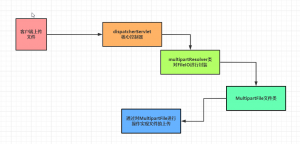
二,SpringMVC中使用域对象
在SpringMVC中使用域对象有四种方式:
- 使用原生Servlet对象
- 使用ModelandView对象
- 使用Map集合
- Mode1对象
一,SpringMVC获取Servlet原生API
在SpringMVC中Hander方法形参中可以接收的Servlet类型的参数:
- HttpServletRequest
- HttpServletResponse
- HttpSession
- Locale
- InputStream
- OutputStream
- writer
- Reader
可以使用原生的HttpSession和HttpServletRequest获取域对象
例:
  @RequestMapping(path = "/wql1")
    public String wql(HttpSession session, HttpServletRequest request){

        session.setAttribute("name","wql");
        request.setAttribute("age","10");
          return "seccion";
    }
}
jsp:
<html>
<head>
    <title>Title</title>
</head>
<body>
<h1>${sessionScope.get("name")}</h1>
<h2>${requestScope.get("age")}</h2>
</body>
</html>
结果:

二,ModelandView
ModelandView:Model设置域,View设置视图
构造ModelAndView对象当控制器处理完请求时,通常会将包含视图名称或视图对象以及一些模型属性的ModelAndView对象返回到DispatcherServlet。
因此,经常需要在控制器中构造ModelAndView对象。
ModelAndView类提供了几个重载的构造器和一些方便的方法,让你可以根据自己的喜好来构造ModelAndView对象。这些构造器和方法以类似的方式支持视图名称和视图对象。
通过ModelAndView构造方法可以指定返回的页面名称,也可以通过setViewName()方法跳转到指定的页面 , 使用addObject()设置需要返回的值,addObject()有几个不同参数的方法,可以默认和指定返回对象的名字。
构造方法:
ModelAndView()  //默认构造函数豆式的用法:填充bean的属性,而不是将在构造函数中的参数。
ModelAndView(String viewName)  //方便的构造时,有没有模型数据暴露。
ModelAndView(String viewName, Map model)  //给出创建一个视图名称和模型新的ModelAndView。
ModelAndView(String viewName, String modelName, Object modelObject)  //方便的构造采取单一的模式对象。
ModelAndView(View view)   //构造方便在没有模型数据暴露。
ModelAndView(View view, Map model)  //创建给定一个视图对象和模型,新的ModelAndView。
ModelAndView(View view, String modelName, Object modelObject)   //方便的构造采取单一的模式对象。
类方法:
ModelAndView  addAllObjects(Map modelMap)  //添加包含在所提供的地图模型中的所有条目。
ModelAndView  addObject(Object modelObject)  //添加对象使用的参数名称生成模型。
ModelAndView  addObject(String modelName,ObjectmodelObject)  //对象添加到模型中。
void  clear()  //清除此ModelAndView对象的状态。
Map  getModel()  //返回的模型图。
protectedMap  getModelInternal()  //返回的模型图。
ModelMap  getModelMap()  //返回底层ModelMap实例(从不为null)。
View  getView()  //返回View对象,或者为null,如果我们使用的视图名称由通过一个ViewResolverDispatcherServlet会得到解决。
String  getViewName()  //返回视图名称由DispatcherServlet的解决,通过一个ViewResolver,或空,如果我们使用的视图对象。
boolean  hasView()  //指示此与否的ModelAndView有一个观点,无论是作为一个视图名称或作为直接查看实例。
boolean  isEmpty()  //返回此ModelAndView对象是否为空,即是否不持有任何意见,不包含模型。
boolean  isReference()  //返回,我们是否使用视图的参考,i.e.
void  setView(Viewview)  //设置此ModelAndView的视图对象。
void  setViewName(StringviewName)  //此ModelAndView的设置视图名称,由通过一个ViewResolverDispatcherServlet会得到解决。
String  toString()  //返回这个模型和视图的诊断信息。
boolean  wasCleared()??  //返回此ModelAndView对象是否为空的调用的结果,以清除(),即是否不持有任何意见,不包含模型。
例:
@Controller
public class test2 {

    @RequestMapping(path = "/wql1")

    //使用ModelandView需要将ModelandView对象返回
    public ModelAndView wql(){
        ModelAndView a=new ModelAndView();
        a.addObject("name","LOVE");
        a.setViewName("seccion");
          return a;
    }
}
jsp页面:
<%@ page contentType="text/html;charset=UTF-8" language="java" %>
<html>
<head>
    <title>Title</title>
</head>
<body>
<h2>${name}</h2>
</body>
</html>
结果:ModelandView页面的跳转是服务器内部的转发,url地址并不会发生改变


三,Mode1
源码:
public interface Model {
    //添加域
    Model addAttribute(String var1, Object var2);

    Model addAttribute(Object var1);
    //将K-V存储在集合中进行存储
    Model addAllAttributes(Collection<?> var1);
    Model addAllAttributes(Map<String, ?> var1);

    Model mergeAttributes(Map<String, ?> var1);

    boolean containsAttribute(String var1);

    Map<String, Object> asMap();
}
四,普通的Map集合
在形参中加入普通的Map集合,底层会把Map集合转化为ModleandView中的ModelMap集合
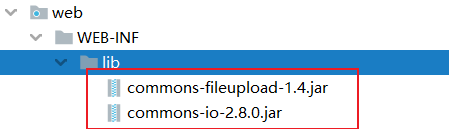
三,文件的上传
文件的上传的jar包:文件上传依赖包
- commons-fileupload
- commons-io
一,Servlet的传统文件上传
不多说
@Controller
public class test8 {
    @RequestMapping(value = "/FQlove")
    public String addddd(HttpServletRequest request) throws Exception {
        //上传位置
        String path = request.getServletContext().getRealPath("/wqlfq");
        File file = new File(path);
        if(!file.exists()){
            file.mkdir();
        }
        //获取request的上传文件项
        DiskFileItemFactory diskFileItemFactory = new DiskFileItemFactory();
        ServletFileUpload servletFileUpload =new ServletFileUpload(diskFileItemFactory);
        //解析request
        List<FileItem> item=servletFileUpload.parseRequest(request);

        //遍历
        for(FileItem item1 : item){
            //判断当前FileItem是否是上传文件项
            if(item1.isFormField()){
                //它为true说明是普通表单项
            }else {
                //上传文件项
                String name = item1.getName();
                System.out.print(name);
                item1.write(new File(path,name));
            }

        }
        System.out.print("文件上传!!!");
        return "seccion";
    }


}
二,SpringMVC实现文件的上传
SpringMVC的文件上传依赖于MultipartFile的类,它把上传的File文件封装成了MultipartFile类对象,通过操作MultipartFile实现文件的上传
底层原理:

MultipartFile源码:
public interface MultipartFile extends InputStreamSource {
    //获取请求url名称
    String getName();
    //获取上传文件的名称
    String getOriginalFilename();
    //获取文件的类型
    String getContentType();
    //判断是否为空
    boolean isEmpty();
    //获取文件大小
    long getSize();
    //缓冲数组
    byte[] getBytes() throws IOException;
    //获取InputStream文件输入流
    InputStream getInputStream() throws IOException;
    //直接对象上传文件进行复制的方法
    void transferTo(File var1) throws IOException, IllegalStateException;
}
一,环境准备
1,将依赖包放入web下的lib目录中
2,在SpringMVC中配置multipartResolver
<bean name="multipartResolver"
      class="org.springframework.web.multipart.commons.CommonsMultipartResolver">
    <!--上传文件的最大大小,单位为字节 -->
    <property name="maxUploadSize" value="17367648787"/>

    <!-- 上传文件的编码 -->
    <property name="defaultEncoding" value="UTF-8"/>
</bean>
二,SpringMVC文件上传(1)
jsp表单:inpu的type必须为file
<form action="/fs1" method="post" enctype="multipart/form-data">
    选择上传文件:<input type="file" name="upload">
    <input type="submit" value="上传">
</form>
上传代码:
@Controller
public class fs1 {
    @RequestMapping("/fs1")
    public String va(MultipartFile upload, HttpServletRequest request) throws IOException {
        //在项目路径下,创建文件夹
        System.out.println("方式1!!!");
        String path = request.getServletContext().getRealPath("fs1");
        String name = upload.getOriginalFilename();//获取上传的文件名
        //判断文件是否存在,不存在创建
        File file = new File(path);
        if(!file.exists()){
            file.mkdir();
        }
        //获取上传的文件输入流
        InputStream inputStream = upload.getInputStream();
        //获取文件的输出流
        OutputStream outputStream = new FileOutputStream(new File(file,name));
        //文件的复制
        int a=0;
        byte[] bytes = new byte[1024];
        while ((a=inputStream.read(bytes))!=-1){
            outputStream.write(bytes,0,a);
        }
        inputStream.close();
        outputStream.close();

        return "seccion";
    }
}
文件的上传目录:为当前项目目录下

三,SpringMVC文件上传(2)
 @RequestMapping(value = "/we",method = RequestMethod.POST)
     public String vc(@RequestParam(value = "upload") MultipartFile upload, HttpServletRequest request) throws IOException {
        String path = request.getServletContext().getRealPath("photo");
        System.out.println(path);
        File file = new File(path);
        if(!file.exists()){
            file.mkdir();
        }
        //方法直接打印
        upload.transferTo(new File(file,upload.getOriginalFilename()));
        return "seccion";
}
四,restful风格
概述:
RESTful也称之为REST(Representational State Transfer),可以理解为一种软件架构风格或者是设计风格
简单来说,RESTful风格就是把请求参数变成请求路径的一种风格
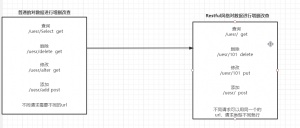
举个例子
而采用RESTful风格后,URL地址请求就会变成
http://.../items/1从上面两个请求我们可以看出,RESTful风格中的URL将请求参数id=1变成了请求路径的一部分,并且URL中的queryItems也变成了items
RESTful风格在HTTP请求中,使用put\delete\post\get方式分别对应添加\删除\修改\查询操作,不过在国内开发一般规范中,还是只使用post和get方式来实现业务的增删查改操作(CRUD)
在SpringMVC中除了支持JSON数据交互之外,同时也支持RESTful风格的编程

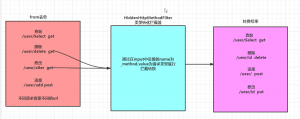
注意:在ajax中它可以发生8中不同的请求,可以对应RequestMapping的值,当不使用ajax请求,普通的from表单只能发送两种请求(post,get),并不能发送请求类型请求,我们就需要一个类型转化的拦截器,进行中间的转化拦截,实现不同请求的rest风格实现
一,普通表单提交实现Restful风格
普通表单只能发送两种请求,我们需要在中间做类型的转化拦截器,把请求拦截(HiddenHttpMethodFilter)进行类型转化

HiddenHttpMethodFilter类型转换拦截器源码:
ublic class HiddenHttpMethodFilter extends OncePerRequestFilter {
    public static final String DEFAULT_METHOD_PARAM = "_method";

    //1,通过这个固定name为键,所以表单所有put和delete是需要讲name设置为_method,值为具体的请求类型
    private String methodParam = "_method";

    public HiddenHttpMethodFilter() {
    }

    public void setMethodParam(String methodParam) {
        Assert.hasText(methodParam, "'methodParam' must not be empty");
        this.methodParam = methodParam;
    }
     //3,
    protected void doFilterInternal(HttpServletRequest request, HttpServletResponse response, FilterChain filterChain) throws ServletException, IOException {
        HttpServletRequest requestToUse = request;
        //判断表单类型是否为post类型,为post就执行,假如为get就直接跳过不就行转化
        if ("POST".equals(request.getMethod()) && request.getAttribute("javax.servlet.error.exception") == null) {
            //接收input name参数的值
            String paramValue = request.getParameter(this.methodParam);
            if (StringUtils.hasLength(paramValue)) {
                //讲值赋值给请求,就行请求类型转换
                requestToUse = new HiddenHttpMethodFilter.HttpMethodRequestWrapper(request, paramValue);
            }
        }

        filterChain.doFilter((ServletRequest)requestToUse, response);
    }

    private static class HttpMethodRequestWrapper extends HttpServletRequestWrapper {
        private final String method;
        //2,获取参数name为method的值
        public HttpMethodRequestWrapper(HttpServletRequest request, String method) {
            super(request);
        //转化成大写
            this.method = method.toUpperCase(Locale.ENGLISH);
        }
        //将大小后的method返回
        public String getMethod() {
            return this.method;
        }
    }
}
在web.xml中配置HiddenHttpMethodFilter:
<filter>
    <filter-name>hiddenHttpMethodFilter</filter-name>
    <filter-class>org.springframework.web.filter.HiddenHttpMethodFilter</filter-class>
</filter>
<filter-mapping>
    <filter-name>hiddenHttpMethodFilter</filter-name>
    <url-pattern>/*</url-pattern>
</filter-mapping>
例:使用put请求
<form>
    <!--必须在name中指定_method,值为请求类型,底层提供参数来获取类型-->
    <input type="hidden" name="_method" value="put">
    <input type="submit" value="提交put请求">
</form>
代码:
@Controller
public class tt {
@RequestMapping(value = "/wq",method = RequestMethod.PUT )
public  String f(HttpServletRequest request){
    //获取请求类型
    System.out.println(request.getMethod());

    return "seccion";
}
}
一,Ajax实现Restful风格
使用Ajax就不需要中间的拦截器了,业务Ajax可以提交多种不同类型的请求
//使用RESTful风格
@RequestMapping("/user/{id}")
@ResponseBody
public User selectUser(@PathVariable("id") String id){
//查看数据的接收
 System.out.println("id->"+id);
 User user = new User();
 //模拟根据id查询出到用户对象数据
 if (id.equals("1234"))user.setUserName("tom");
 return user; }
jsp:
<%@ page contentType="text/html;charset=UTF-8" language="java" %>
 <html>
 <head>
<title>RESTful测试</title>
 <script src="http://libs.baidu.com/jquery/1.11.3/jquery.min.js"></script>
<script type="text/javascript">
 function search() { //获取输入的查询编号 var id = $("#number").val();
 $.ajax({ url:"${pageContext.request.contextPath}/users/user/"+id, type:"GET",
//定义回调响应的数据格式为JSON字符串 dataType:"JSON",
 success:function (data) { if (data.userName != null)
{ alert("您查询的用户:"+data.userName); }else
{ alert("没有查找到id为:"+id+"的用户") } } }); }
 </script>
</head>
<body>
 <form> 编号: <input type="text" name="number" id="number">
 <input type="button" value="确定" onclick="search()">
</form>
</body>
</html
五,拦截器
一,拦截器和过滤器的区别
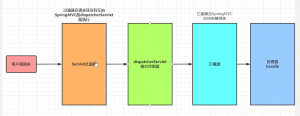
过滤器是Servlet配置的,它直接作用在Servlet上,拦截器是SpringMVC提供的在请求交由dispatcherServlet控制

过滤器的优先级高于拦截器
二,拦截器的实现方式
自定义拦截器主要有两种实现方式:
- 实现HandlerInterceptor接口
- 继承HandlerInterceptorAdapter适配器类
HandlerInterceptorAdapter和HandlerInterceptor的关系:HandlerInterceptorAdapter实现了HandlerInterceptor类,并对HandlerInterceptor接口方法进行了初始化
![]()
![]()
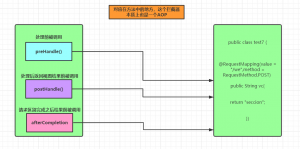
拦截器的三个主要方法:
1,preHandle():这个方法在handler处理器处理请求之前被调用,它的返回值为Boolean当拦截请求之后需要处理器去处理就返回true,不需要就返回false
2,postHandle():这个方法在处理器处理为请求逻辑之后,但DispatcherServlet控制器并没有返回结果时调用
3,afterCompletion():在DispatcherServlet完成处理好请求后被调用

三,拦截器的配置
拦截器在SpringMVC的配置文件中配置
1,方式1
<mvc:interceptors>
    <!--拦截的class,默认路径tt类下的所有请求-->
    <bean class="com.fq.tt"></bean>
</mvc:interceptors>
2,方式2
<mvc:interceptors>
<!--这种方式拦截器上必须加注解@Component-->
    <ref bean="tt"></ref>
</mvc:interceptors>
3,方式3
<mvc:interceptors>
    <mvc:interceptor>
       <!--拦截的类-->
        <bean></bean>
         <!--类下要拦截的请求,默认全部请求-->
        <mvc:mapping path="/"/>
          <!--要放行的请求-->
        <mvc:exclude-mapping path=""/>
    </mvc:interceptor>
</mvc:interceptors>
Comments | NOTHING