1.ES安装
1.1 Windows安装
Elasticsearch的官方地址:https://www.elastic.co/cn/
现在使用Elasticsearch为7.16.0
① 下载地址:https://artifacts.elastic.co/downloads/elasticsearch/elasticsearch-7.16.0-windows-x86_64.zip
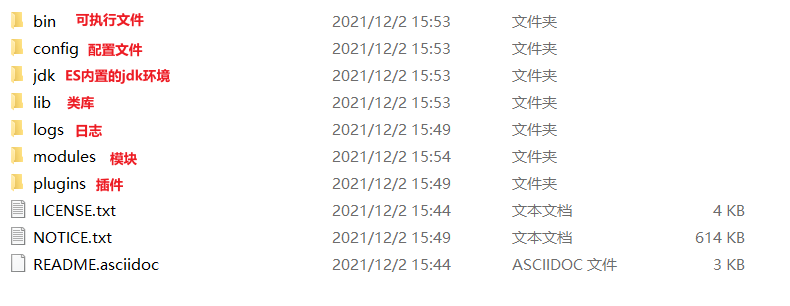
② 解压压缩包:
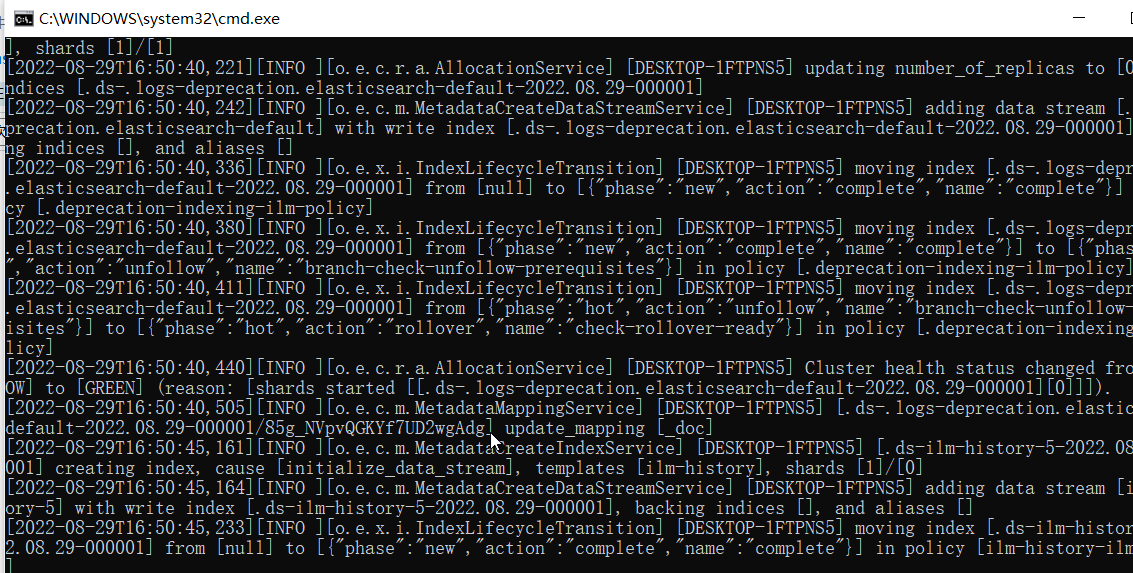
③ 启动ES:执行bin目录中的elasticsearch.bat文件
注:9300端口为Elasticsearch集群间组件的通信端口,9200端口为浏览器访问的http协议Restful端口
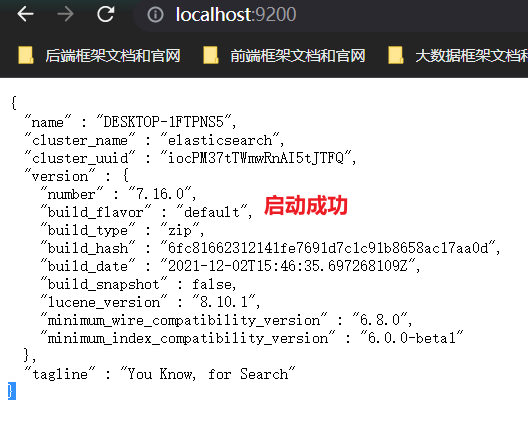
④ 通过浏览器访问ES:http://localhost:9200/
安装时可能出现的问题:
1)Elasticsearch是使用java开发的,且7.8版本以上的ES都需要JDK版本1.8以上,默认安装包带有jdk环境,如果系统配置的JAVA_HOME,那么使用系统默认的JDK,如果没有配置使用自带的jdk,建议使用系统配置的JDK
2)双击启动窗口闪退,通过路径访问追踪错误,如果是"空间不足",就修改config/jvm.options配置文件
# 设置JVM初始内存为1G。此值可以设置与-Xmx相同,以避免每次垃圾回收完成后JVM重新分配内存
# Xms represents the initial size of total heap space
# 设置JVM最大可用内存为1G
# Xmx represents the maximum size of total heap space
-Xms4g
-Xmx4g
1.2 Linux单节点安装
安装包下载地址:https://www.elastic.co/cn/downloads/past-releases#elasticsearch
① 解压软件
# 解压软件
tar -zxvf elasticsearch-7.14.0-linux-x86_64.tar.gz
② 创建用户
因为安全问题,ES不允许root用户直接运行,所以要创建新用户
# 添加用户
useradd estest
# 为用户设置密码
passwd estest
# 修改文件的所有者权限(在root角色下设置)
chown -R estest:estest /home/elasticsearch-7.14.0
③ 修改配置文件
1.修改./elasticsearch-7.14.0/config/elasticsearch.yml,在这个配置文件中加入如下内容
# 集群名称
cluster.name: elasticsearch
# 节点名称
node.name: node-1
# 允许如何IP进行访问
network.host: 0.0.0.0
# 访问端口
http.port: 9200
# 设置集群主节点
cluster.initial_masteer_nodes: ["node-1"]
2.修改/etc/security/limits.conf(estest为用户)
# 在文件末尾加入以下内容
# 每个进程可以打开的文件数的限制
* soft nofile 65536
* hard nofile 131072
* soft nproc 2048
* hard nproc 4096
3.修改/etc/security/limits.d/20-nproc.conf
# 在文件末尾加入以下内容
# 每个进程可以打开的文件数的限制
* soft nofile 65536
* hard nofile 65536
# 操作系统级别对每个用户创建的进程数的限制
* hard nproc 4096
# 注:* 代表Linux所有用户名称
4.修改/etc/sysctl.conf
# 在文件末尾加入以下内容
# 一个进程可以拥有的VMA(虚拟内存区域)的数量,默认值为65536
vm.max_map_count=655360
5.重新加载
sysctl -p
④ 启动软件
./bin/elasticsearch
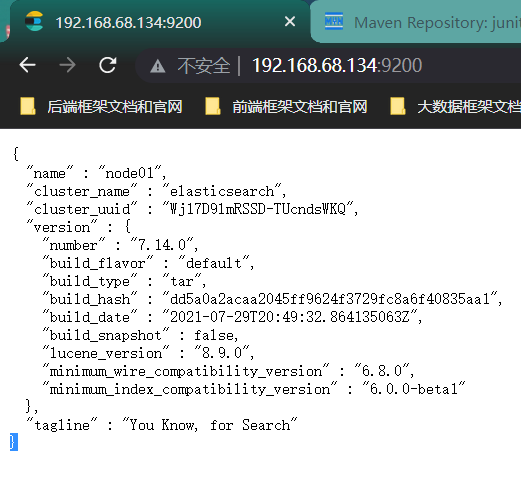
⑤ 访问ES的WEB页面
1.3 ES的Linux集群部署
|
cluster name
|
node name
|
IP Addr
|
http端口 / 通信端口
|
|
itcast-es
|
itcast1
|
192.168.149.135
|
9201 / 9700
|
|
itcast-es
|
itcast2
|
192.168.149.135
|
9202 / 9800
|
|
itcast-es
|
itcast3
|
192.168.149.135
|
9203 / 9900
|
1,拷贝副本
拷贝opt目录下的elasticsearch-7.4.0安装包3个,打开虚拟机到opt目录
执行 拷贝三份
cd /opt
cp -r elasticsearch-7.4.0 elasticsearch-7.4.0-itcast1
cp -r elasticsearch-7.4.0 elasticsearch-7.4.0-itcast2
cp -r elasticsearch-7.4.0 elasticsearch-7.4.0-itcast3
2,修改elasticsearch.yml配置文件
① 创建日志目录
cd /opt
mkdir logs
mkdir  data
# 授权给itheima用户
chown -R itheima:itheima ./logs
chown -R itheima:itheima ./data

chown -R itheima:itheima ./elasticsearch-7.4.0-itcast1
chown -R itheima:itheima ./elasticsearch-7.4.0-itcast2
chown -R itheima:itheima ./elasticsearch-7.4.0-itcast
打开elasticsearch.yml配置,分别配置下面三个节点的配置文件
vim /opt/elasticsearch-7.4.0-itcast1/config/elasticsearch.yml
vim /opt/elasticsearch-7.4.0-itcast2/config/elasticsearch.yml
vim /opt/elasticsearch-7.4.0-itcast3/config/elasticsearch.yml
② itcast1节点的配置文件
#集群名称
cluster.name: itcast-es
#节点名称
node.name: itcast-1
#是不是有资格主节点
node.master: true
#是否存储数据
node.data: true
#最大集群节点数
node.max_local_storage_nodes: 3
#ip地址
network.host: 0.0.0.0
#端口
http.port: 9201
#内部节点之间沟通端口
transport.tcp.port: 9700
#es7.x 之后新增的配置,节点发现
discovery.seed_hosts: ["localhost:9700","localhost:9800","localhost:9900"]
#es7.x 之后新增的配置,初始化一个新的集群时需要此配置来选举master
cluster.initial_master_nodes: ["itcast-1", "itcast-2","itcast-3"]
#数据和存储路径
path.data: /opt/data
path.logs: /opt/logs
③ itcast2节点的配置文件
#集群名称
cluster.name: itcast-es
#节点名称
node.name: itcast-2
#是不是有资格主节点
node.master: true
#是否存储数据
node.data: true
#最大集群节点数
node.max_local_storage_nodes: 3
#ip地址
network.host: 0.0.0.0
#端口
http.port: 9202
#内部节点之间沟通端口
transport.tcp.port: 9800
#es7.x 之后新增的配置,节点发现
discovery.seed_hosts: ["localhost:9700","localhost:9800","localhost:9900"]
#es7.x 之后新增的配置,初始化一个新的集群时需要此配置来选举master
cluster.initial_master_nodes: ["itcast-1", "itcast-2","itcast-3"]
#数据和存储路径
path.data: /opt/data
path.logs: /opt/logs
④ itcast3节点的配置文件
#集群名称
cluster.name: itcast-es
#节点名称
node.name: itcast-3
#是不是有资格主节点
node.master: true
#是否存储数据
node.data: true
#最大集群节点数
node.max_local_storage_nodes: 3
#ip地址
network.host: 0.0.0.0
#端口
http.port: 9203
#内部节点之间沟通端口
transport.tcp.port: 9900
#es7.x 之后新增的配置,节点发现
discovery.seed_hosts: ["localhost:9700","localhost:9800","localhost:9900"]
#es7.x 之后新增的配置,初始化一个新的集群时需要此配置来选举master
cluster.initial_master_nodes: ["itcast-1", "itcast-2","itcast-3"]
#数据和存储路径
path.data: /opt/data
path.logs: /opt/logs
执行授权:
# 在root用户下执行
chown -R itheima:itheima /opt/elasticsearch-7.4.0-itcast1
chown -R itheima:itheima /opt/elasticsearch-7.4.0-itcast2
chown -R itheima:itheima /opt/elasticsearch-7.4.0-itcast3
# 如果有的日志文件授权失败,可使用(也是在root下执行)
cd /opt/elasticsearch-7.4.0-itcast1/logs
chown -R itheima:itheima ./*
cd /opt/elasticsearch-7.4.0-itcast2/logs
chown -R itheima:itheima ./*
cd /opt/elasticsearch-7.4.0-itcast3/logs
chown -R itheima:itheima ./*
⑤ 启动三个节点的ES
/opt/elasticsearch-7.4.0-itcast1/bin/elasticsearch
/opt/elasticsearch-7.4.0-itcast2/bin/elasticsearch
/opt/elasticsearch-7.4.0-itcast3/bin/elasticsearch
查看节点信息:
http://192.168.149.135:9201/_cat/nodes
2. 通过Rest请求实现基础操作
2.1 索引的操作
2.1.1 创建索引
对比关系型数据库,创建索引就等同于创建数据库
创建的格式:PUT请求表示创建索引
http://localhost:9022/索引名
例:在Postman中,向ES服务器发PUT请求: http://localhost:9022/kxj
请求成功后,服务器返回json格式的响应结果:
{
    "acknowledged": true, //创建是否成功
    "shards_acknowledged": true,
    "index": "kxj" //索引名称
}
PUT请求创建索引具有幂等性,同样的结果是一样的,如果重复发送同样的创建请求就会报错
例:再次发送PUT请求: http://localhost:9022/kxj,响应的json结果
{
    "error": {
        "root_cause": [
            {
                "type": "resource_already_exists_exception",
                "reason": "index [kxj/zw8F2K-mQha4bJKyPqfdEg] already exists",
                "index_uuid": "zw8F2K-mQha4bJKyPqfdEg",
                "index": "kxj"
            }
        ],
        "type": "resource_already_exists_exception",
        "reason": "index [kxj/zw8F2K-mQha4bJKyPqfdEg] already exists",
        "index_uuid": "zw8F2K-mQha4bJKyPqfdEg",
        "index": "kxj"
    },
    "status": 400
}
创建索引不能使用POST请求
{
    "error": "Incorrect HTTP method for uri [/kxj] and method [POST], allowed: [DELETE, HEAD, PUT, GET]",
    "status": 405
}
2.1.2获取索引信息
http://localhost:9022/索引名
获取所有的索引信息:
http://localhost:9200/_cat/indices
- v:详细信息
例1:获取kxj索引信息,发送get请求 http://localhost:9200/kxj
{
    "kxj": {
        "aliases": {},
        "mappings": {},
        "settings": {
            "index": {
                "routing": {
                    "allocation": {
                        "include": {
                            "_tier_preference": "data_content"
                        }
                    }
                },
                "number_of_shards": "1",
                "provided_name": "kxj",
                "creation_date": "1661827893195",
                "number_of_replicas": "1",
                "uuid": "zw8F2K-mQha4bJKyPqfdEg",
                "version": {
                    "created": "7160099"
                }
            }
        }
    }
}
例2:获取所有索引的信息,发送get请求 http://localhost:9200/_cat/indices?v
health status index uuid                   pri rep docs.count docs.deleted store.size pri.store.size
yellow open   kxj   zw8F2K-mQha4bJKyPqfdEg   1   1          0            0       226b           226b
2.1.3 删除索引
删除格式:发送Delete请求
http://localhost:9022/索引名
例:删除索引kxj, http://localhost:9200/kx
{
    "acknowledged": true //删除成功
}
2.2 文档的操作
2.2.1 添加文档
添加文档是在索引的基础上进行的,通过索引绑定具体的内容(文档),文档就类比关系性数据库中的表数据, 添加数据的格式为JSON格式
请求类型:post和put请求都可以,但也有区别
- post:是添加文档的默认支持请求,没有幂等性要求,相同的id后面的请求会覆盖前面的请求
- put:在指定的id没有冲突下使用,因为幂等性,如果id重复则会报错,所以在put创建时需要指定id
创建文档的格式:
方式1:http://localhost:9200/索引/_doc/id
方式1:http://localhost:9200/索引/_create/id
具体的内容通过请求体携带
注:id为可选项,不指定可以自动生成
例:向ES的kxj索引创建文档
响应内容:
{
    "_index": "kxj", //索引名
    "_type": "_doc", //类型:文档
    "_id": "l18C7YIB8XJcTdD8WJMX", //id:不知道系统自动生成
    "_version": 1,
    "result": "created",
    "_shards": {
        "total": 2,
        "successful": 1,
        "failed": 0
    },
    "_seq_no": 0,
    "_primary_term": 1
}
2.2.2 文档的查询
2.2.2.1 主键查询
顾名思义主键查询就是按照主键进行查询
主键查询格式:使用get请求类型
http://localhost:9200/索引/_doc/id
例:查询id为1000的文档, http://localhost:9200/kxj/_doc/1000
{
    "_index": "kxj",
    "_type": "_doc",
    "_id": "1000",
    "_version": 1,
    "_seq_no": 4,
    "_primary_term": 1,
    "found": true,
    "_source": {
        "title": "机械革命z3",
        "price": 6999
    }
}
2.2.2.2 全部查询
格式:get请求
http://localhost:9200/索引/_doc/_search
例: http://localhost:9200/kxj/_doc/_search
{
    "took": 59,//时间ms
    "timed_out": false,//是否超时
    "_shards": {
        "total": 1,
        "successful": 1,
        "skipped": 0,
        "failed": 0
    },
    "hits": {
        "total": {
            "value": 5,
            "relation": "eq"
        },
        "max_score": 1.0,
        "hits": [//命中的结果
            {
                "_index": "kxj",
                "_type": "_doc",
                "_id": "l18C7YIB8XJcTdD8WJMX",
                "_score": 1.0,
                "_source": {
                    "title": "机械革命z3",
                    "price": 6999
                }
            }
        ]
    }
}
2.2.3 文档修改
2.2.3.1 全量修改
全量修改就是修改doc中全部的数据
格式:使用PUT请求
http://localhost:9200/索引/_doc/id
修改的内容在body中提交
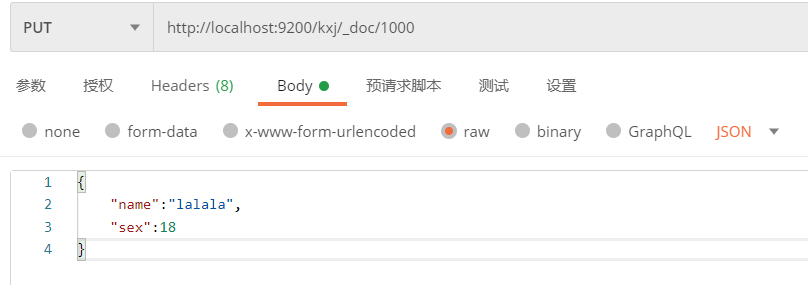
例:修改kxj索引中id为1000的doc内容
修改前的内容:
{
    "title": "机械革命z3",
    "price": 6999
    }
请求:
修改后查询内容:
{
    "_index": "kxj",
    "_type": "_doc",
    "_id": "1000",
    "_version": 3,
    "_seq_no": 6,
    "_primary_term": 1,
    "found": true,
    "_source": {
        "name": "lalala",
        "sex": 18
    }
}
2.2.3.2 局部修改
一般修改doc不会使用全量修改,更多的使用局部修改
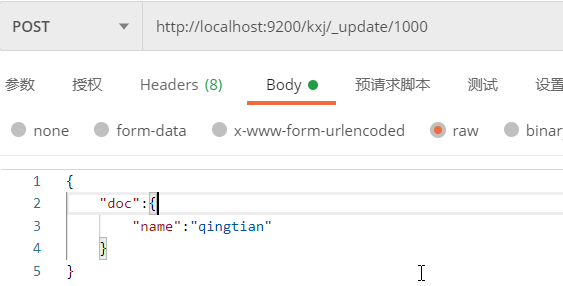
格式:Post请求
http://localhost:9200/索引/_update/id
例:修改id为1000的doc内容
响应:
{
    "_index": "kxj",
    "_type": "_doc",
    "_id": "1000",
    "_version": 4,
    "result": "updated",
    "_shards": {
        "total": 2,
        "successful": 1,
        "failed": 0
    },
    "_seq_no": 7,
    "_primary_term": 1
}
2.2.4 文档的删除
格式:delete请求
http://localhost:9200/索引/_doc/id
例:删除id为1000的doc, http://localhost:9200/kxj/_doc/1000
{
    "_index": "kxj",
    "_type": "_doc",
    "_id": "1000",
    "_version": 5,
    "result": "deleted",
    "_shards": {
        "total": 2,
        "successful": 1,
        "failed": 0
    },
    "_seq_no": 8,
    "_primary_term": 1
}
2.3 复杂查询
2.3.1 条件查询
条件查询就是按照doc的字段json内容进行条件查询
1)请求路径进行条件查询
格式:get请求
http://localhost:9200/索引/_search?q=字段:值
例:查询name有lalala的doc, http://localhost:9200/kxj/_search?q=name:lalala
{
    "took": 3,
    "timed_out": false,
    "_shards": {
        "total": 1,
        "successful": 1,
        "skipped": 0,
        "failed": 0
    },
    "hits": {
        "total": {
            "value": 1,
            "relation": "eq"
        },
        "max_score": 0.2876821,
        "hits": [//匹配的内容
            {
                "_index": "kxj",
                "_type": "_doc",
                "_id": "1000",
                "_score": 0.2876821,
                "_source": {
                    "name": "lalala",
                    "sex": 18
                }
            }
        ]
    }
}
注:这种请求地址就行匹配有很大问题,如中文乱码等,一般使用body就行查询
2)在请求体中进行查询
① 请求地址格式:
http://localhost:9200/索引/_search
② 请求体的格式:
{
    "query": {//声明查询
        "match":{//匹配查询
                "字段":"匹配值"
             }
        }
    }
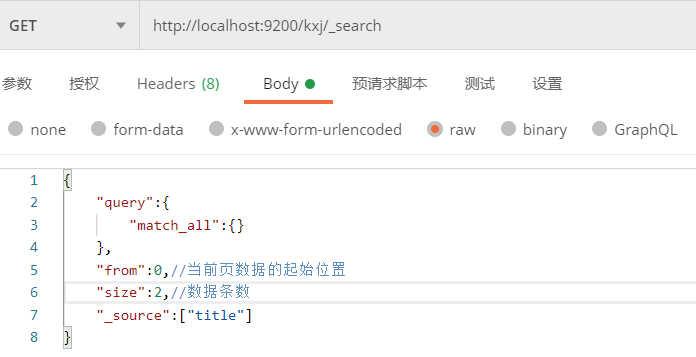
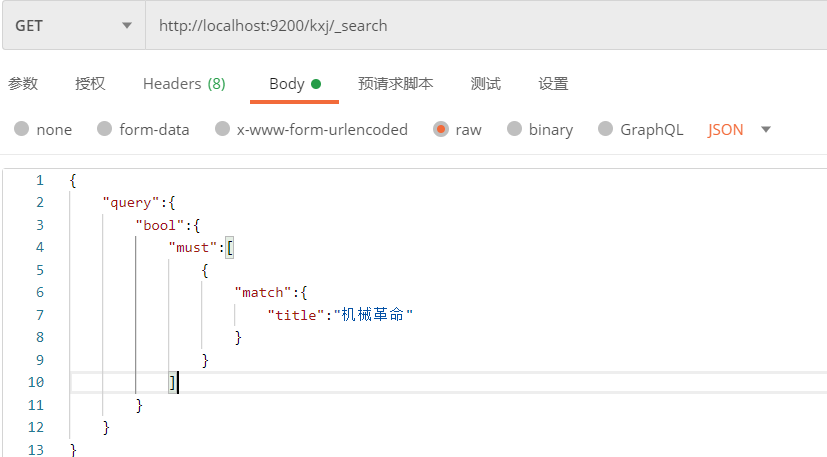
- match:匹配查询
- match_all:全量查询
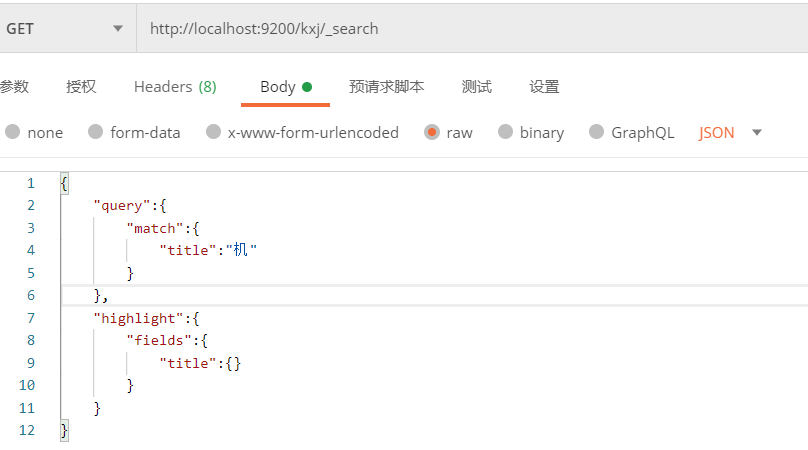
例:查询name为lalala的doc





Comments | 1 条评论
+-+