一,Session的存储和共享问题
一,单机Session的存储过程
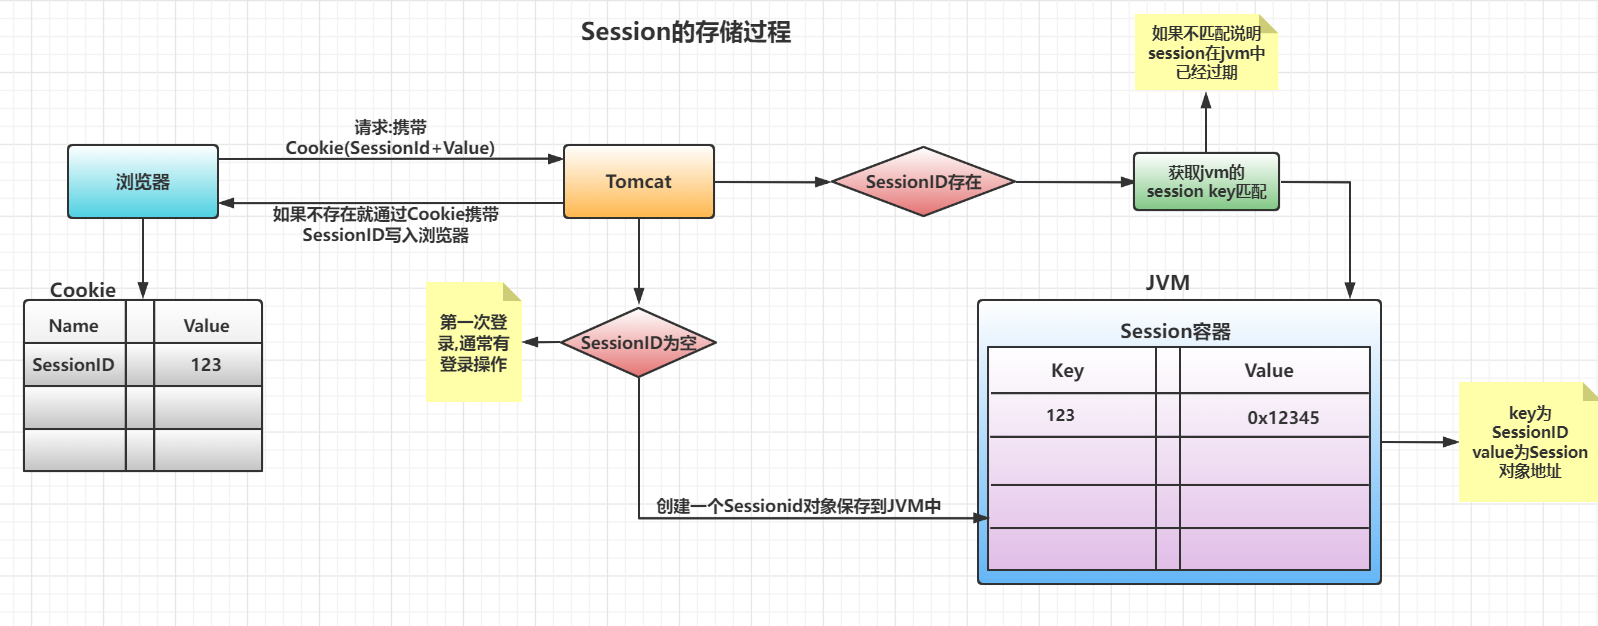
过程:
- 用户用浏览器请求web网站,每一次请求浏览器都会将Cookie数据传入Tomcat(无论Cookie有没有数据都会传输)
- Tomcat接收到用户请求,从Cookie中寻找name为sessionID的数据
- 如果Cookie中没有name为sessionid的数据,证明用户第一次访问,服务器为用户创建一个session数据并保存到JVM中,再通过cookie将sessionid返回给用户浏览器
- 如果Cookie中拥有name为sessionid来获取数据如果数据存在则表示当前session有效,直接返回数据
- 如果数据不存在说明session在JVM已经过期,Tomcat会重新创建一个Session以及sessionid并记录在JVM,然后将SessionID通过Cookie写入浏览器

二,集群下Session共享问题和解决方案
一,集群下的session共享问题
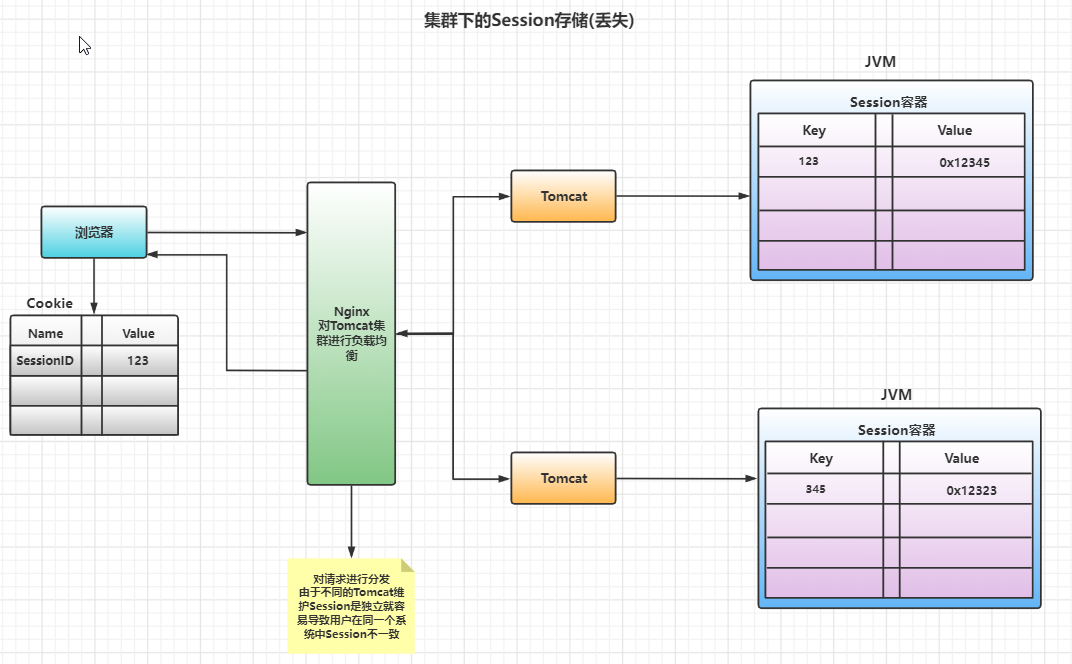
单机情况下session交于容器(Tomcat)来负责存储和管理,但是如何项目部署在多台tomcat中,则session管理存在很大的问题:
1,多台tomcat之间无法共享session,比如用户A服务器已经登录了,当时Nginx负载均衡将用户跳转到tomcatB服务器,由于B服务器没有用户登录信息,session就会失效,用户退出登录
2,一旦tomcat容器关闭或重启也会导致session会话失效
因此如果项目部署在多台tomcat中,就需要解决session共享问题

二,共享Session的解决方案
解决方案主要有四种:
- 容器拓展插件:辅助session到其他Tomcat
- Nginx的ip hash负载均衡:使用用户绑定集群中的一台服务器
- 自定义写一套Session管理工具实现
- 使用框架的session管理工具如SpringSession
1,容器拓展插件:
- 基于Tomcat的tomcat-redis-session-manager插件
- 基于Jetty的jetty-session-redis插件,memcached-session-manager插件
优点:这种方案对项目是透明的,无需改动代码,解耦性好
缺点:
- 过于依赖容器(tomcat),一旦容器升级或不适配需要重新配置
- 底层是session复制,有一定的延迟,所以不能使用在大集群中
2,Nginx的ip hash负载均衡
优点:实现较为觉得,配置Nginx的负载均衡策略即可
缺点:
- ip hash负载均衡的ip不能变更,如果用户跨地域那么ip变化了,该方案就失效了
- 如果服务器发生故障,那么需要重新定位,就会跳转到另一台集群,session也失效了
3,自己写一套session管理工具
优点:自己写可以根据业务场景进行自定义,更灵活
缺点:
- 自定义开发的复杂度和时间都要消耗,项目进度需要延长
- 管理工具的后期测试修改也需要时间保证,质量可能不是很好
4,使用第三方框架SpringSession(最常用的方案)
优点:
- 既不需要依赖容器(Tomcat)也不需要修改代码
- Spring Session效率和代码质量高是非常契合的解决方案
二,SpringSession的概述和使用配置
一,SpringSession的概述
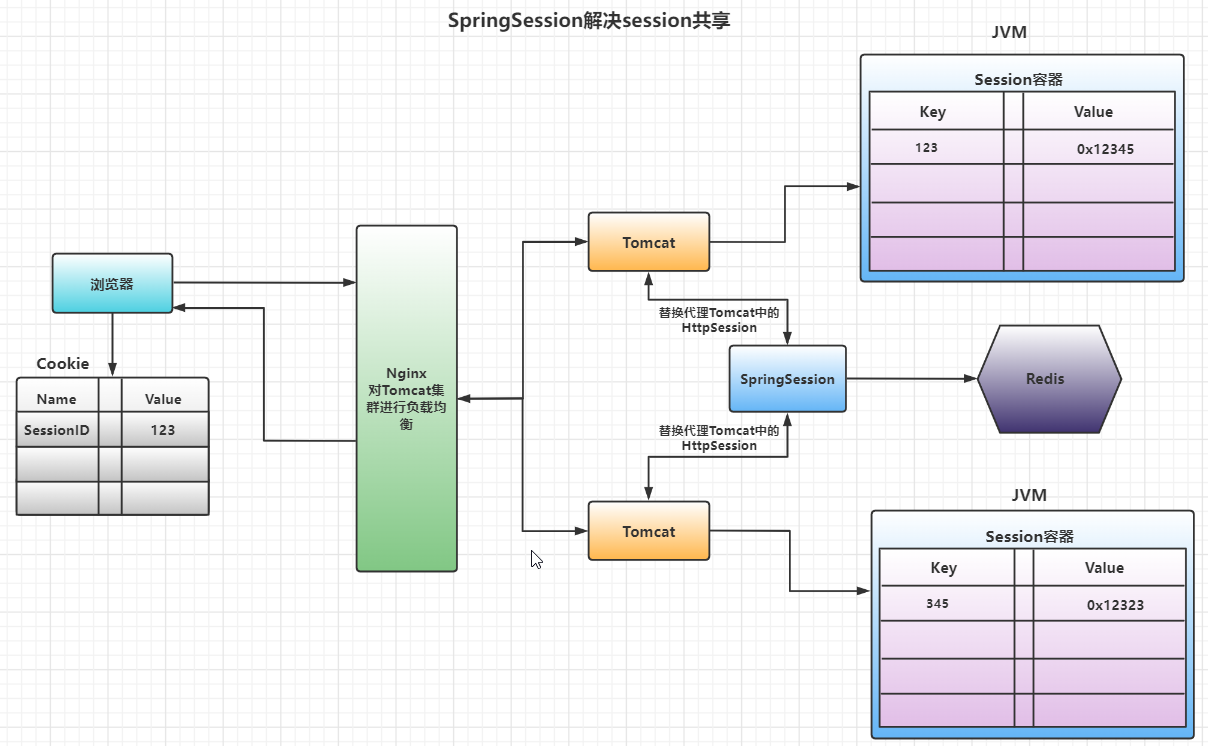
Spring Session是Spring家族中的一个子项目,它提供一组API和实现,用于管理用户的session信息
它把servlet容器实现的httpsession替换为spring-session,专注于解决session管理问题,session信息存储在Redis中,可简单快速且无缝的集成到我们的应用中
SpringSession的特征:
- 提供用户session管理的API和实现
- 提供HttpSession,以中立的方式取代web容器的session,比如tomcat中的session
- 支持集群的session处理,不必绑定到具体的web容器去解决集群下的session共享问题
二,用spring和servlet演示Session不共享和共享
一,Session不共享演示
通过servlet搭建一个简单案例演示session不共享问题
① pom依赖
<dependencies>
    <dependency>
        <groupId>javax.servlet</groupId>
        <artifactId>javax.servlet-api</artifactId>
        <version>4.0.0</version>
    </dependency>

    <dependency>
        <groupId>javax.servlet</groupId>
        <artifactId>jstl</artifactId>
        <version>1.2</version>

    </dependency>
    <dependency>
        <groupId>javax.servlet.jsp</groupId>
        <artifactId>javax.servlet.jsp-api</artifactId>
        <version>2.3.3</version>
    </dependency>

</dependencies>
② web.xml
<?xml version="1.0" encoding="UTF-8"?>
<web-app xmlns="http://xmlns.jcp.org/xml/ns/javaee"
         xmlns:xsi="http://www.w3.org/2001/XMLSchema-instance"
         xsi:schemaLocation="http://xmlns.jcp.org/xml/ns/javaee http://xmlns.jcp.org/xml/ns/javaee/web-app_4_0.xsd"
         version="4.0">

</web-app>
③ getservlet方法
@WebServlet(name = "getservlet" ,urlPatterns = "/get")
public class Getservlet extends HttpServlet {


    @Override
    protected void doGet(HttpServletRequest req, HttpServletResponse resp) throws ServletException, IOException {
        this.doPost(req,resp);
    }


    @Override
    protected void doPost(HttpServletRequest req, HttpServletResponse resp) throws ServletException, IOException {
        String mykey = (String)req.getSession().getAttribute("mykey");
        resp.getWriter().println(mykey);
    }
}
④ setservlet方法
@WebServlet(name = "setservlet" ,urlPatterns = "/set")
public class Setservlet extends HttpServlet {


    @Override
    protected void doGet(HttpServletRequest req, HttpServletResponse resp) throws ServletException, IOException {
        this.doPost(req,resp);
    }


    @Override
    protected void doPost(HttpServletRequest req, HttpServletResponse resp) throws ServletException, IOException {
        req.getSession().setAttribute("mykey","WQL SpringSession");
        resp.getWriter().println("WQL SpringSession");
    }
}
⑤ 项目打包并引入tomcat省略
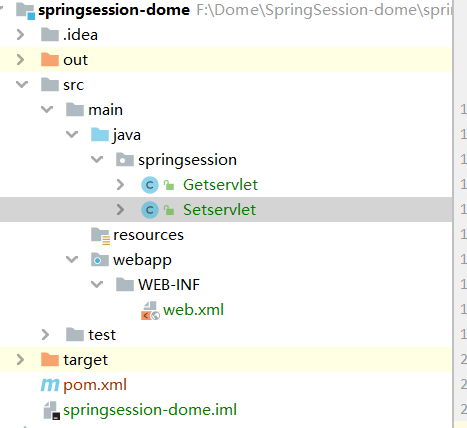
目录结构:

⑥ 测试 开启两个tomcat

通过setservlet方法设置session,如果两个tomcat都能显示则说明session共享,如果另一个tomcat没有就说明session不共享
1,通过8080的tomcat调用setservlet方法,设置一个session

2,在8081的tomcat调用getservlet方法,看session是否可以调用到

二,集成SpringSession实现Session共享
在原基础进行集成SpringSession
① 导入依赖
<dependency>
    <groupId>org.springframework.session</groupId>
    <artifactId>spring-session-data-redis</artifactId>
    <version>2.5.5</version>
</dependency>

<dependency>
    <groupId>org.springframework</groupId>
    <artifactId>spring-web</artifactId>
    <version>5.1.4.RELEASE</version>
</dependency>
② 配置web.xml文件
<?xml version="1.0" encoding="UTF-8"?>
<web-app xmlns="http://xmlns.jcp.org/xml/ns/javaee"
         xmlns:xsi="http://www.w3.org/2001/XMLSchema-instance"
         xsi:schemaLocation="http://xmlns.jcp.org/xml/ns/javaee http://xmlns.jcp.org/xml/ns/javaee/web-app_4_0.xsd"
         version="4.0">


    <!--配置SpringSession在Tomcat中的过滤器-->
    <filter>
        <filter-name>springSessionRepositoryFilter</filter-name>
        <filter-class>org.springframework.web.filter.DelegatingFilterProxy</filter-class>
    </filter>
    <filter-mapping>
        <filter-name>springSessionRepositoryFilter</filter-name>
        <url-pattern>/*</url-pattern>
    </filter-mapping>


    <!--配置Spring监听器加载配置文件,默认只加载WEB-INF目录下的Spring配置文件,所有要重新指定路径-->
    <listener>
        <listener-class>org.springframework.web.context.ContextLoaderListener</listener-class>
    </listener>
    <!--设置Spring配置文件路径-->
    <context-param>
        <param-name>contextConfigLocation</param-name>
        <param-value>classpath:Spring_WQL.xml</param-value>
    </context-param>

</web-app>
③ spring配置文件
<?xml version="1.0" encoding="UTF-8"?>
<beans xmlns="http://www.springframework.org/schema/beans"
       xmlns:xsi="http://www.w3.org/2001/XMLSchema-instance"
       xmlns:context="http://www.springframework.org/schema/context"
       xsi:schemaLocation="
      http://www.springframework.org/schema/beans http://www.springframework.org/schema/beans/spring-beans-3.2.xsd
      http://www.springframework.org/schema/context http://www.springframework.org/schema/context/spring-context-4.3.xsd">
    <!--定义一个配置SpringSession-->
    <bean class="org.springframework.session.data.redis.config.annotation.web.http.RedisHttpSessionConfiguration">

    </bean>

    <bean id="jedisConnectionFactory" class="org.springframework.data.redis.connection.jedis.JedisConnectionFactory">
        <property name="hostName" value="127.0.0.1"/>
        <property name="port" value= "6379"/>
    </bean>

    <context:annotation-config/>

</beans>
④ getservlet方法
@WebServlet(name = "getservlet" ,urlPatterns = "/get")
public class Getservlet extends HttpServlet {


    @Override
    protected void doGet(HttpServletRequest req, HttpServletResponse resp) throws ServletException, IOException {
        this.doPost(req,resp);
    }


    @Override
    protected void doPost(HttpServletRequest req, HttpServletResponse resp) throws ServletException, IOException {
        String mykey = (String)req.getSession().getAttribute("mykey");
        resp.getWriter().println(mykey);
    }
}
⑤ setservlet方法
@WebServlet(name = "setservlet" ,urlPatterns = "/set")
public class Setservlet extends HttpServlet {


    @Override
    protected void doGet(HttpServletRequest req, HttpServletResponse resp) throws ServletException, IOException {
        this.doPost(req,resp);
    }


    @Override
    protected void doPost(HttpServletRequest req, HttpServletResponse resp) throws ServletException, IOException {
        req.getSession().setAttribute("mykey","WQL SpringSession");
        resp.getWriter().println("WQL SpringSession");
    }
}
通过setservlet方法设置session,如果两个tomcat都能显示则说明session共享,如果另一个tomcat没有就说明session不共享
1,通过8080的tomcat调用setservlet方法,设置一个session

2,在8081的tomcat调用getservlet方法,看session是否可以调用到
三,SpringBoot整合SpringSession
SpringBoot整合SpringSession不需要额外配置,SpringBoot对SpringSession进行了自动配置,用户只需要导入pom依赖,配置redis就OK
① 导入maven依赖
<dependencies>
   <dependency>
      <groupId>org.springframework.boot</groupId>
      <artifactId>spring-boot-starter-data-redis</artifactId>
   </dependency>
   <dependency>
      <groupId>org.springframework.boot</groupId>
      <artifactId>spring-boot-starter-web</artifactId>
   </dependency>
   <dependency>
      <groupId>org.springframework.session</groupId>
      <artifactId>spring-session-data-redis</artifactId>
   </dependency>

   <dependency>
      <groupId>org.projectlombok</groupId>
      <artifactId>lombok</artifactId>
      <optional>true</optional>
   </dependency>
   <dependency>
      <groupId>org.springframework.boot</groupId>
      <artifactId>spring-boot-starter-test</artifactId>
      <scope>test</scope>
   </dependency>
</dependencies>
② 配置redis
spring.redis.host=127.0.0.1
spring.redis.port=6379
server.port=8081
③ 测试session
@Controller
public class test {

    @RequestMapping("/setsession")
    public void setsession(HttpServletRequest request,HttpServletResponse response) throws IOException{

        request.getSession().setAttribute("key","WQL SpringBoot SpringSession");
        response.getWriter().println("WQL SpringBoot SpringSession");

    }

    @RequestMapping("/getsession")
    public void getsession(HttpServletRequest request,HttpServletResponse response) throws IOException{

        String a = (String) request.getSession().getAttribute("key");
        response.getWriter().println(a);
    }}
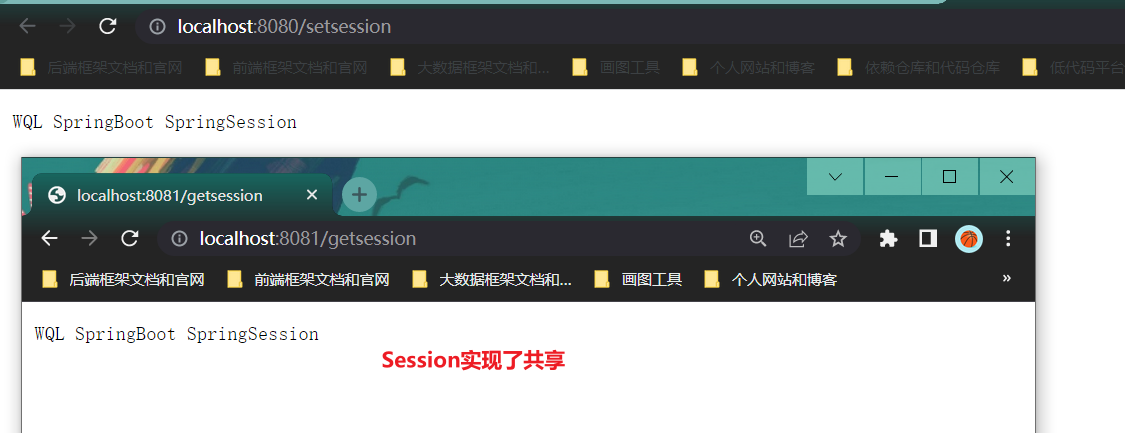
④ 开启两个springboot应用程序(一个为8080,一个为8081)
- 8080设置session
- 8081去取session

四,Redis中Session数据存放结构

1,sessions文件:保存每一个session的数据和时间信息
session主要保存四个主要数据:
- sessionAttr:session的key和具体数据
- lastAccessed:最后一次访问时间
- maxinactiveinite:session过期时间,默认是30分钟
- creationTime:session的创建时间
其中maxinactiveinite和lastAccessed是实时更新的

五,SpringSession的应用场景
SpringSession应用场景主要有三个:
- 同域名下同项目
- 同域名下不同项目
- 同根域名不同子域名的项目
注:SpringSession对不同域名的单点登录功能是做不了的,需要专门的SSO来实现
一,同域名下相同项目实现session共享
在同域名下,比如:wql.luoqin.ltd
同一个项目,部署了多台tomcat实现集群,同项目的集群实现session共享不需要额外配置,直接整合springsession即可
二,同域名下不同项目实现session共享
不同项目的session保存路径是不一样的,如:
- wql.luoqin.ltd/shop:商城项目
- wql.luoqin.ltd/bk:博客项目
这两个项目的session保存路径是不一样的,实现共享路径不一致,容易导致session获取不到
这种情况需要配置springsession的session的保存路径:将不同项目的session路径设置一致
- server.servlet.session.cookie.path="/"
三,同根域名不同子域名的项目实现session共享
同根域名下的不同子域名,如:
- wql.luoqin.ltd
- fq.luoqin.ltd
这种子域名session的保存域名不一样和同域名的不同项目差不多,需要将session存储的域名设置为统一的
- server.servlet.session.cookie.domain="luoqin.ltd"
- 统一为根域名即可
六,SpringSession的一些配置
|
|
|
评论会话 cookie。
|
|
|
|
会话 cookie 的域。
|
|
|
|
是否对会话 cookie 使用“HttpOnly”cookie。
|
|
|
|
会话 cookie 的最长期限。如果未指定持续时间后缀,则将使用秒。
|
|
|
|
会话 cookie 名称。
|
|
|
|
会话 cookie 的路径。
|
|
|
|
是否始终将会话 cookie 标记为安全。
|
|
|
false
|
是否在重新启动之间保留会话数据。
|
|
|
|
用于存储会话数据的目录。
|
|
|
30m
|
会话超时。如果未指定持续时间后缀,则将使用秒。
|
|
|
|
会话跟踪模式。
|






Comments | NOTHING