Mybatis除了ORM各种SQL操作外,还提供了一个强大的查询缓存功能,它可以非常方便的配置和定制缓存,可以极大的提升查询效率
Mybatis默认定义了两级缓存:
- 一级缓存(本地缓存):默认情况下只有一级缓存开启
- 二级缓存(全局缓存):它需要手动开启和配置,它是基于namespace基本的缓存
- 对于二级缓存,Mybatis为了提供拓展性定义了一个Cache缓存接口,用户可以提供实现Cache接口自定义二级缓存,官方也提供redis,ehcache等缓存框架来整合二级缓存
一,一级缓存
一,一级缓存的使用
一级缓存是Mybatis默认就开启的
一级缓存:与数据库同一次会话期间查询到的数据会放入本地缓存中,以后如果需要获取相同的数据直接从本地缓存中取,不需要查询数据库
一级缓存的命中条件:
- 同一个SqlSession会话
- 同样的查询条件
简单使用一级缓存:mapper接口和pojo这里省略
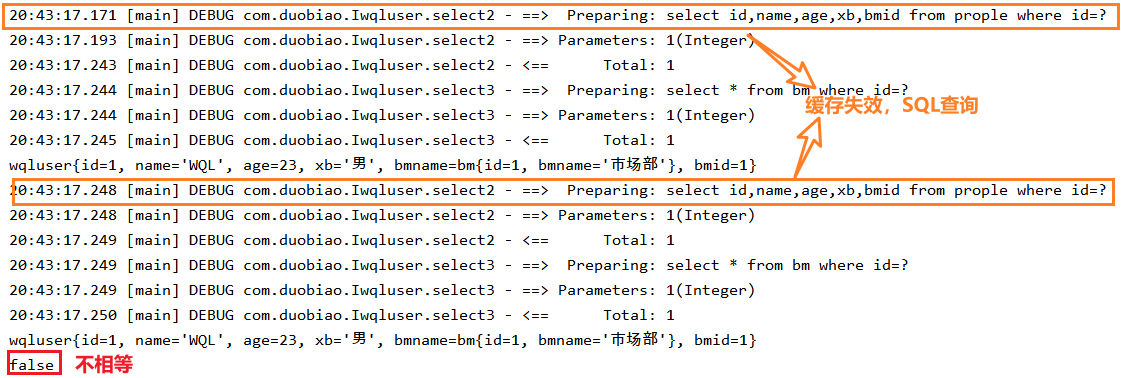
① 测试一级缓存:同一个sqlsession和同样的查询语句
② 结果
二,一级缓存失效的四种情况
一级缓存失效可以从命中条件反推它的失效条件
四种失效情况:
- 使用的SqlSession对象不同
- SqlSession对象相同,查询条件不同
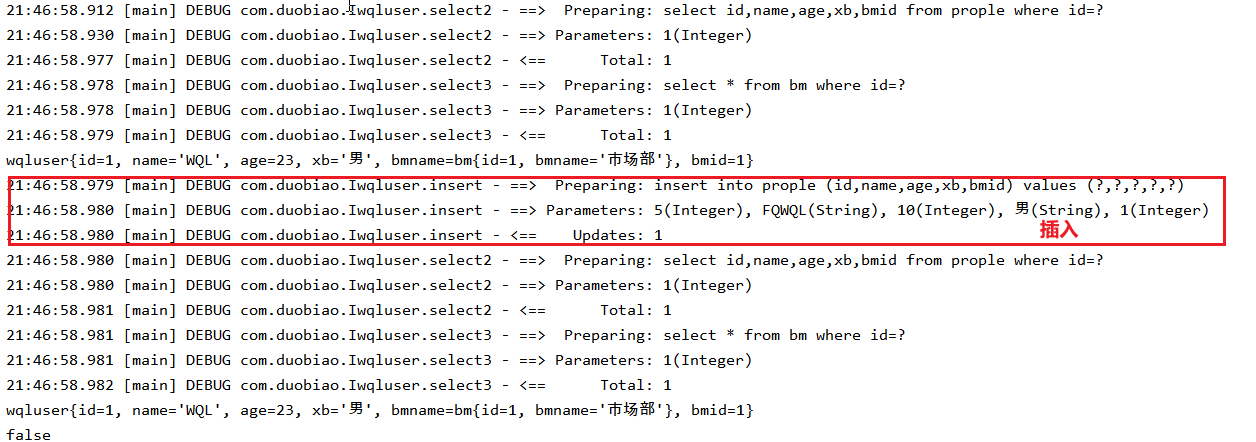
- 两次查询期间执行了增删改操作
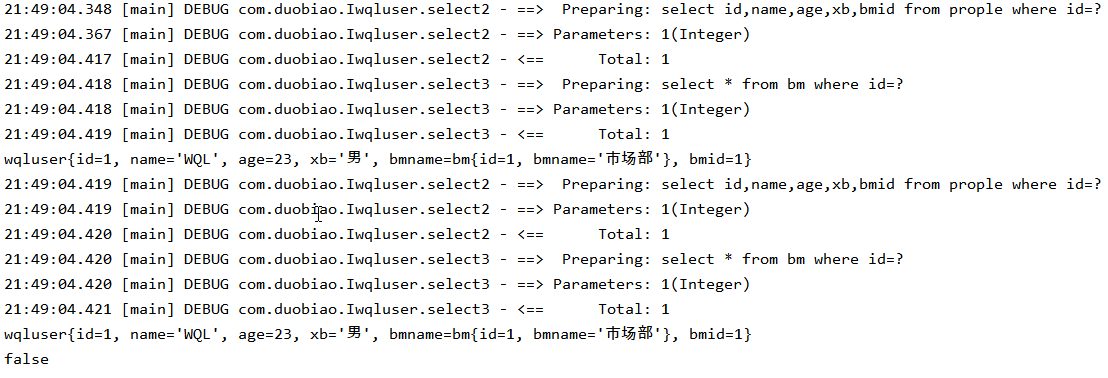
- 手动清除了一级缓存
注:上述条件一个出现都不会触发一级缓存
一,使用不同的SqlSession对象
① 测试
public class test3 {
    public static void main(String[] args) throws IOException {
        //读取主配置文件
        InputStream stream= Resources.getResourceAsStream("mybatisconfig.xml");

        //Sqlsession工厂创建器
        SqlSessionFactoryBuilder sessionFactoryBuilder= new SqlSessionFactoryBuilder();

        //创建SqlSession工厂
        SqlSessionFactory sqlSessionFactory=sessionFactoryBuilder.build(stream);

        //获取SqlSession1对象和SqlSession2对象
        SqlSession session1=sqlSessionFactory.openSession();
        SqlSession session2=sqlSessionFactory.openSession();

        //通过SqlSession获取两个代理接口
        Iwqluser iprople1= session1.getMapper(Iwqluser.class);
        Iwqluser iprople2= session2.getMapper(Iwqluser.class);

        //查询1
        wqluser wqluser1 =  iprople1.select2(1);
        System.out.println(wqluser1);
        //查询2
        wqluser wqluser2 =  iprople2.select2(1);
        System.out.println(wqluser2);
        //判断两个结果对象是否相对
        System.out.println(wqluser1==wqluser2);
        session1.close();
        session2.close();
         }}
二,使用不同的查询条件
① 测试
public class test3 {
    public static void main(String[] args) throws IOException {
        //读取主配置文件
        InputStream stream= Resources.getResourceAsStream("mybatisconfig.xml");

        //Sqlsession工厂创建器
        SqlSessionFactoryBuilder sessionFactoryBuilder= new SqlSessionFactoryBuilder();

        //创建SqlSession工厂
        SqlSessionFactory sqlSessionFactory=sessionFactoryBuilder.build(stream);

        //获取SqlSession1对象
        SqlSession session1=sqlSessionFactory.openSession();
        //通过SqlSession获取代理接口
        Iwqluser iprople1= session1.getMapper(Iwqluser.class);
        //查询1
        wqluser wqluser1 =  iprople1.select2(1);
        System.out.println(wqluser1);
        //查询2
        wqluser wqluser2 =  iprople1.select2(2);
        System.out.println(wqluser2);
        //判断两个结果对象是否相对
        System.out.println(wqluser1==wqluser2);
        session1.close();}}
② 结果
三,两次查询期间执行了增删改操作
① 测试
public class test3 {
    public static void main(String[] args) throws IOException {
        //读取主配置文件
        InputStream stream= Resources.getResourceAsStream("mybatisconfig.xml");

        //Sqlsession工厂创建器
        SqlSessionFactoryBuilder sessionFactoryBuilder= new SqlSessionFactoryBuilder();

        //创建SqlSession工厂
        SqlSessionFactory sqlSessionFactory=sessionFactoryBuilder.build(stream);

        //获取SqlSession1对象
        SqlSession session1=sqlSessionFactory.openSession();
        //通过SqlSession获取代理接口
        Iwqluser iprople1= session1.getMapper(Iwqluser.class);
        //查询1
        wqluser wqluser1 =  iprople1.select2(1);
        System.out.println(wqluser1);
        //执行一个插入操作
        prople wqlusers = new prople();
        wqlusers.setId(5);
        wqlusers.setName("FQWQL");
        wqlusers.setAge(10);
        wqlusers.setBmid(1);
        wqlusers.setXb("男");
        iprople1.insert(wqlusers);
        //查询2
        wqluser wqluser2 =  iprople1.select2(1);
        System.out.println(wqluser2);
        //判断两个结果对象是否相对
        System.out.println(wqluser1==wqluser2);
        session1.close();
         }
}
② 结果
四,手动清除缓存
① 测试
public class test3 {
    public static void main(String[] args) throws IOException {
        //读取主配置文件
        InputStream stream= Resources.getResourceAsStream("mybatisconfig.xml");

        //Sqlsession工厂创建器
        SqlSessionFactoryBuilder sessionFactoryBuilder= new SqlSessionFactoryBuilder();

        //创建SqlSession工厂
        SqlSessionFactory sqlSessionFactory=sessionFactoryBuilder.build(stream);

        //获取SqlSession1对象
        SqlSession session1=sqlSessionFactory.openSession();
        //通过SqlSession获取代理接口
        Iwqluser iprople1= session1.getMapper(Iwqluser.class);
        //查询1
        wqluser wqluser1 =  iprople1.select2(1);
        System.out.println(wqluser1);

        //清空一级缓存
        session1.clearCache();

        //查询2
        wqluser wqluser2 =  iprople1.select2(1);
        System.out.println(wqluser2);
        //判断两个结果对象是否相对
        System.out.println(wqluser1==wqluser2);
        session1.close();

         }
}
② 结果
二,二级缓存
二级缓存是基于namespace(xml映射文件)的缓存,一个namespace对应一个二级缓存
工作机制:
- 一个SqlSession会话,查询一条数据,这个数据会被放在一级缓存中
- 如果会话关闭,一级缓存中的数据并没有清空而是会被保存到二级缓存中,新的会话查询信息也参照二级缓存
- 不同的namespace查出的数据会放在自己对应的缓存中
- Mybatis自带的二级缓存本质上是一个Map集合,但它提供了一个Cache接口可以整合第三方缓存如Redis,MenCache,EhCache
一,二级缓存的使用
二级缓存使用:
- 在主配置文件中开启二级缓存
- 在具体的xml映射文件使用二级缓存
注:在主配置文件中开启二级缓存,如果在具体的映射文件中没有设置缓存,缓存也不会生效
① 在主配置文件中开启二级缓存
<settings>
<!--开启二级缓存,默认其实也是开启的,但一般开发中,开启的配置需要指定-->
<setting name="cacheEnabled" value="true"/>
</settings>
② 在映射文件中设置二级缓存
<!--在映射文件中设置这个标签就表明开启了,但它还要参数,默认可以不设置使用默认值-->
<cache></cache>
③ pojo类需要实现序列化接口
cache标签的参数:
1,eviction:缓存的回收策略
- LRU:最近最少使用的,移除最长时间不被使用的对象(默认)
- FIFO:先进先出,按照对象进入缓存的顺序来移除它们
- SOFT:软引用,移除基于垃圾回收器状态和软引用规则的对象
- WEAK:弱引用,更积极的移除基于垃圾收集器状态和弱引用规则的对象
2,FlushInterval:缓存刷新间隔,缓存多长时间清空一次,默认不清空,值为毫秒
3,readOnly:是否只读
- true:只读,mybatis认为所有从缓存中获取数据的操作都是只读操作,不会修改数据,追踪方式Mybatis会直接将数据的真实引用交给用户,假如用户修改了数据就不安全但速度快
- false:非只读,mybatis觉得获取的数据会被修改,会利用序列号和反序列号克隆数据给用户,这种方式安全但速度不快(默认)
4,size:缓存存放多少数据
5,type:指定自定义缓存的全类名,这个是缓存的一个拓展,它提供了一个Cache接口给用户可以自定义缓存,假如实现了自定义缓存把全类名填进去即可
注:查出的数据都会默认放在一级缓存中,只有会话提交或者关闭以后,一级缓存中的数据才会转移到二级缓存中,因此在使用二级缓存时,必须将一级缓存的SqlSession提交或者关闭
例:
① 测试
public class test3 {
    public static void main(String[] args) throws IOException {
        //读取主配置文件
        InputStream stream= Resources.getResourceAsStream("mybatisconfig.xml");

        //Sqlsession工厂创建器
        SqlSessionFactoryBuilder sessionFactoryBuilder= new SqlSessionFactoryBuilder();

        //创建SqlSession工厂
        SqlSessionFactory sqlSessionFactory=sessionFactoryBuilder.build(stream);

        //获取SqlSession1对象和SqlSession2对象
        SqlSession session1=sqlSessionFactory.openSession();
        SqlSession session2=sqlSessionFactory.openSession();

        //通过SqlSession获取两个代理接口
        Iwqluser iprople1= session1.getMapper(Iwqluser.class);
        Iwqluser iprople2= session2.getMapper(Iwqluser.class);

        //查询1
        wqluser wqluser1 =  iprople1.select2(1);
        System.out.println(wqluser1);

        //关闭session1会话,让该缓存中的数据进入到二级缓存中
        session1.close();

        //查询2
        wqluser wqluser2 =  iprople2.select2(1);
        System.out.println(wqluser2);
        //判断两个结果对象是否相对
        System.out.println(wqluser1==wqluser2);
        session2.close();
         }
}
② 结果
三,缓存的相关属性和设置
-
默认为true使用缓存
-
false:不使用缓存,但这里只对二级缓存有效
<select id="select1" resultMap="wql" useCache="true">
    select prople.id,bm.bmname,prople.name,prople.age,prople.xb,prople.bmid from prople left  join bm on prople.bmid=bm.id
</select>
-
默认为ture,每执行一次就会清除缓存,这就是为什么执行增删改操作,一级缓存会失效的原因
-
这个清除缓存,对一级缓存和二级缓存都有效
<insert id="insert" parameterType="com.fq.prople" flushCache="true">
    insert into prople (id,name,age,xb,bmid) values (#{id},#{name},#{age},#{xb},#{bmid})
</insert>
-
每一次查询之前都会清空缓存,那么一二级缓存都是无效的
四,缓存机制的执行流程
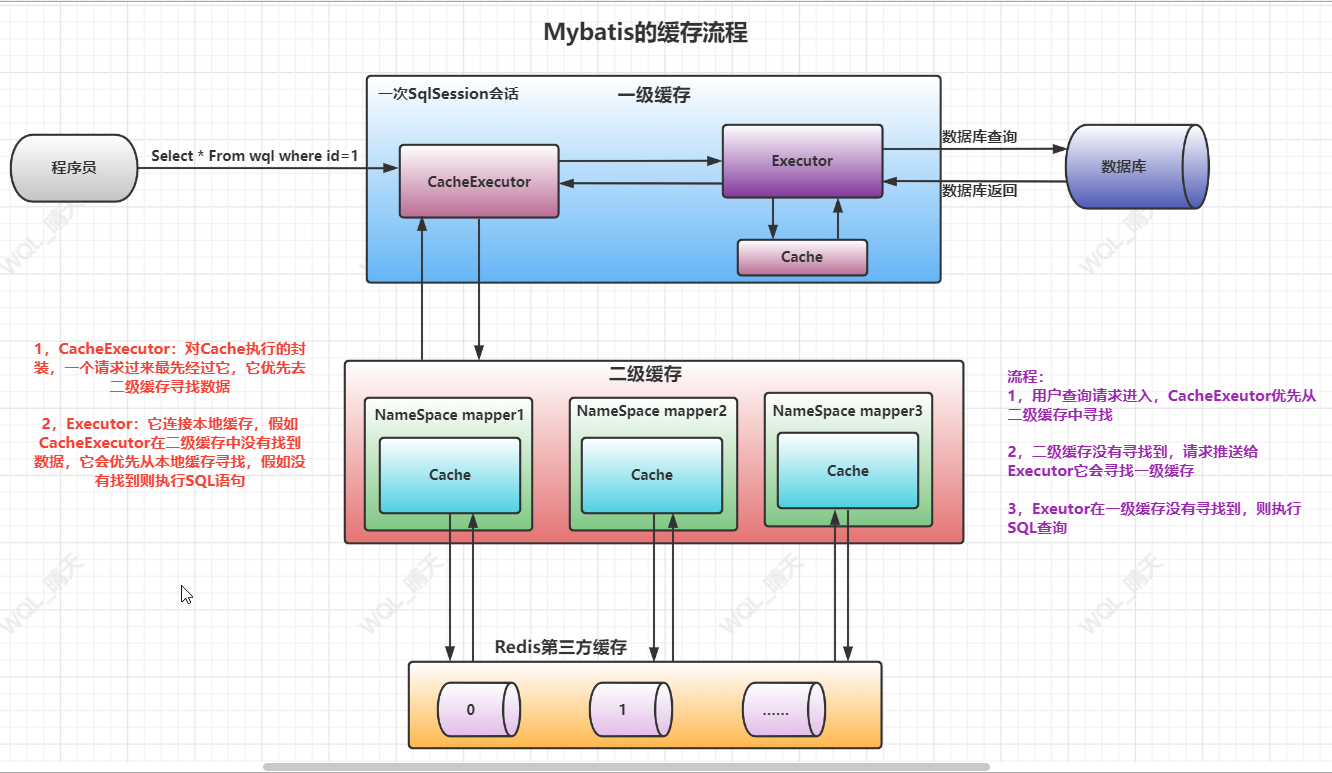
缓存执行的总体流程:
- 优先二级缓存
- 一级缓存
- 真实查询
五,Mybatis整合第三方缓存
Mybatis的一级缓存合二级缓存本质上都是保存在内存中的Map集合,Mybatis的缓存实现了Cache接口
一,Cache接口
Cache是缓存实现的顶级接口,Mybatis本地缓存(一级缓存),全局缓存(无第三方整合)都对Cache做了实现
整合第三方缓存也是使用这个接口,Myabtis提供了整合第三方缓存的适配包,如:Ehcache,Memcache,Redis……,这些适配包无一例外都实现了Cache接口
Cache接口的源码:
public class PerpetualCache implements Cache {
    //设置当前Map的唯一ID
    private final String id;
    //Map集合,保存缓存数据
    private Map<Object, Object> cache = new HashMap();

    public PerpetualCache(String id) {
        this.id = id;
    }

    public String getId() {
        return this.id;
    }
    //设置缓存的大小
    public int getSize() {
        return this.cache.size();
    }
    //put数据到缓存Map
    public void putObject(Object key, Object value) {
        this.cache.put(key, value);
    }
    //获取cache数据
    public Object getObject(Object key) {
        return this.cache.get(key);
    }
    //移除cache数据
    public Object removeObject(Object key) {
        return this.cache.remove(key);
    }
    //清空缓存,本质上就是清空Map
    public void clear() {
        this.cache.clear();
    }
    //获取读写锁
    public ReadWriteLock getReadWriteLock() {
        return null;
    }


    public boolean equals(Object o) {
        if (this.getId() == null) {
            throw new CacheException("Cache instances require an ID.");
        } else if (this == o) {
            return true;
        } else if (!(o instanceof Cache)) {
            return false;
        } else {
            Cache otherCache = (Cache)o;
            return this.getId().equals(otherCache.getId());
        }
    }

    public int hashCode() {
        if (this.getId() == null) {
            throw new CacheException("Cache instances require an ID.");
        } else {
            return this.getId().hashCode();
        }
    }
}
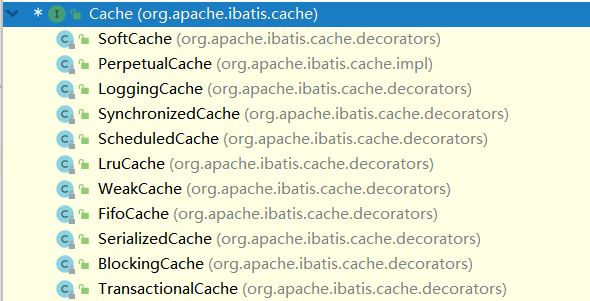
Cache接口的实现类:
- SoftCache:软引用类型Cache
- LruCache:Lru类型的Cache
- PerprtualCache:默认一级缓存使用的Cache
- WeakCache:弱引用类型的Cache
- FifoCache:先进先出类型的Cache
- ……
二,整合Redis第三方缓存
步骤:
- 项目整合并配置Redis
- 引入Mybatis-redis适配包
- 在映射Map文件中配置Cache标签的type,指定为第三方缓存,这个类适配包会提供
适配包Github地址(Mybatis作者开发):https://github.com/harawata?tab=repositories
整合Redis为第三方缓存的文档:http://mybatis.org/redis-cache/
redis缓存适配包maven坐标:
<dependency>
    <groupId>org.mybatis.caches</groupId>
    <artifactId>mybatis-redis</artifactId>
    <version>1.0.0-beta2</version>
  </dependency>
整合演示:
1,配置redis(配置不做解释)
① 导入redis和spring整合依赖
<dependency>
    <groupId>org.springframework.data</groupId>
    <artifactId>spring-data-redis</artifactId>
    <version>2.5.3</version>
</dependency>

<dependency>
    <groupId>redis.clients</groupId>
    <artifactId>jedis</artifactId>
    <version>3.6.3</version>
</dependency>
② 配置Redis
<!-- 1、配置连接池信息 -->
<bean id="jedisPoolConfig" class="redis.clients.jedis.JedisPoolConfig">
    <!-- 最大连接数-->
    <property name="maxTotal" value="50"></property>
    <property name="maxIdle" value="5"></property>
</bean>
<!--2、spring整合Jedis(Redis) 也就是配置连接工厂JedisConnectionFactory-->
<bean id="jedisConnectionFactory" class="org.springframework.data.redis.connection.jedis.JedisConnectionFactory">
    <!--需要自定义(指定)一些工厂属性配置信息-->
    <!--        指定服务器地址-->
    <property name="hostName" value="127.0.0.1"></property>
    <!--        指定服务端口号-->
    <property name="port" value="6379"/>
    <!--        指定密码(Redis3之前可以不指定,之后都要)-->
    <property name="password" value="yichun"/>
    <!--   自定义连接池配置:再把第一步配置好的连接池信息通过属性注入进来  如果不自定义会采用默认的连接池配置,工厂中有属性new JedisPoolConfig-->
    <property name="poolConfig" ref="jedisPoolConfig"></property>
</bean>
<!--    3、配置RedisTemplate模板   把第二步配置好的连接工厂JedisConnectionFactory通过属性注入到RedisTemplate模板中-->
<bean id="redisTemplate" class="org.springframework.data.redis.core.RedisTemplate">
    <property name="connectionFactory" ref="jedisConnectionFactory"></property>
    <!--如下配置是为了之后的key和value的序列化操作,暂时不配制也是OK的-->
    <property name="keySerializer">
        <bean class="org.springframework.data.redis.serializer.StringRedisSerializer"></bean>
    </property>
    <property name="valueSerializer">
        <bean class="org.springframework.data.redis.serializer.StringRedisSerializer"></bean>
    </property>
</bean>
2,导入适配器依赖(上面有)
3,在映射文件设置cache的类型为redis
<mapper namespace="org.acme.FooMapper">
  <cache type="org.mybatis.caches.redis.RedisCache" />
</mapper>





Comments | NOTHING